Introduction to Value Practice

This project is a full introduction to different shading techniques to portray the art element of value in artwork. We use the same ways to practice each technique by drawing a value scale, a sphere with shadow, and a cylinder with shadow to practice each technique.

The three techniques that we work on with this assignment are pencil shading, cross-hatching and stippling with a pen. Each technique really helps a student take their artwork to the next level in mastery. They can take two dimensional shapes and create a more three dimensional form to show space and give a more advanced look to their work.

The following is a stop motion video I did to show my students how to do the stippling technique.
 

This video shows the lesson given with the cross-hatching technique:


Student Work Examples

  • 8th grade student

Austin’s Butterfly – A Lesson on Critique

This is one of my favorite lessons. This lesson is one of the moments when I get to watch my students think about art differently and think about their work differently. This lesson ties the content to other subjects and shows how art can be used to learn valuable life lessons beyond just learning to think creatively.

We Begin by doing a quick drawing of a butterfly. I do not explain to the students why we are drawing the butterfly. We have a warm-up drawing for every class and so this becomes our warm-up for the day. Then we watch the following video:

My Austin’s Butterfly Lesson Recording

Student Flipgrid Responses

Painting Our Emotions

Many artists describe painting their emotions and feelings into their artwork. In this assignment we explore how we can represent our emotions in our artwork.

How do we represent an emotion?

What color do you associate with an emotion? Do you think your emotion can be described with shape and with line? How else can we express what we are feeling with art?

Please watch the following video of a lesson I created to help students explore how they can portray an emotion:

Student Artwork Examples


Semester Reflection

Instructions

I can’t believe our semester is already ending. It didn’t end the way we thought it would when we first started that is for sure!! Every semester I have my students reflect on their experience in art and their artwork. I want you to do the same thing now. I want you to write an answer to the following questions on this documentthis document and send the document back to me. I want you to be honest, I want you to consider your answers and use correct grammar when answering the questions. Reflect on your feelings about where you started and where you ended up with your artwork. I also want to know your honest feelings. I use these responses to create lessons and improve my class for the next group of students.
Please come to the school and pickup your artwork it is in the cafeteria. It is separated by class and arranged alphabetically by class.
I want you to know that I am glad I got to be your teacher. I hope you have a good summer and get some rest in. I hope we can see each other in person in the fall. Take care of yourselves! I miss you!!

Come and Pick Up Your Work!!

I have everyone’s portfolio of work for the semester in the cafeteria ready for you to come and pick it up. I have fired the seventh grades pots that were waiting to be fired so you can also take those home. Please make sure you come and pick up your student’s work before Wednesday!!

If you have not signed up for a time slot please find the sign-up here:
Materials Pick UpMaterials Pick Up

The Principles of Design

Instructions

The principles of Design are a crucial piece into understanding how to arrange the elements of art into your artwork. Remember the elements? Line, shape, color, value(shading), texture, form(3-D Shapes), and space. Using these elements to create your artwork help put the language of art into your work. Everyone was given a worksheet the day we left school that has the elements listed. You are to write the definition of each element of art as it pertains to the art world and then draw your own illustration of each principle in the space given. You will cut out the pieces of the principles and then stack them according to size and staple them. These should be put into your sketchbook so you can refer back to them. They are a good resource to have. I am including a video of the same teacher who we watched for the face drawings. I think she does a fantastic job with explaining the principles and how they are used. Developing your composition when you create art is a very important skill to have. I know our semester is winding down. Keep doing amazing work! We are almost done. If you need the pdf of the principles I have also attached it here.

Drawing Noses and Mouths

This week we continue with drawing facial features. We will be drawing a nose and a mouth. Please watch the following videos as an example of how to do this. It takes practice just like the eyes we did last week. We are getting ready to do a self portrait once we get all of our facial features. Remember when we started this semester and we drew a face on the back of our student information sheets? This is when you see just how far you have come this semester in your skills! There is a method to all of these pieces we are working on.

Please send your noses and mouths that you draw.

Hopefully I can get a gallery of all of your hard work while we have been away from each other very soon. I will let you know when that is live for your viewing pleasure.

I miss you all and I hope you are doing well!
Mrs. Wong

Drawing Realistic Eyes

Hello! To all of you that are working hard and turning in your work you are doing a good job!! Keep up the good work!!

This week we will begin with drawing the face. We will start with the eyes. Please use the video and follow along on how to draw a realistic eye. Take your time and pay extra attention to detail. I am noticing a lot of the drawings that are being turned in can be a bit more detailed. Drawing eyes is a bit more difficult but I want you to really try and do your best. You may surprise yourself with how well you do. Also practice, drawing more than one eye can help you improve your skills. Practice in art helps you grow your skills.

I miss you all and I hope you are doing well! If you have any questions please contact me via email or send me a message in edmodo.

Sketch Your Bedroom like Vincent Van Gogh’s Bedroom at Arles Painting

Hello! I hope you all enjoyed your spring break and are refreshed and ready to get back to work!

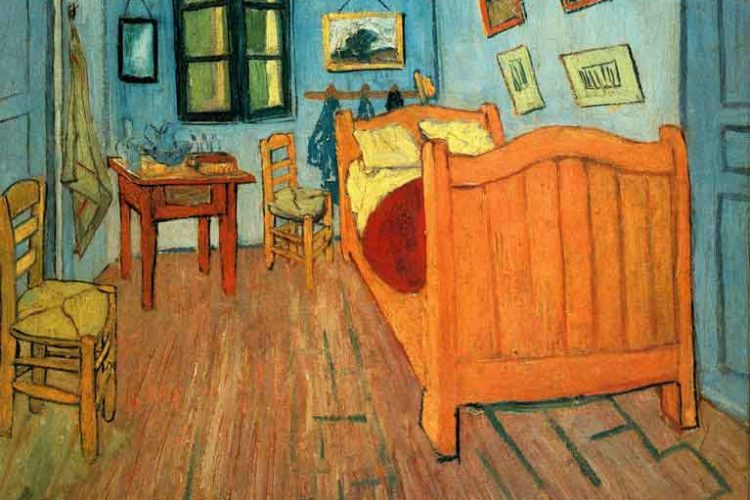
This week’s assignment is for you to draw and color your bedroom. When Van Gogh live in Arles, France he painted the bedroom he lived in. It is a simple painting but still shows his brilliant use of color and his grasp of the element of Space. He used a perspective to show space in the room similar to how we used perspective in art class. I would like for you to draw your bedroom as realistically as possible. I want you to take your time, to try and show three dimensional space, to color it neatly and use difference in value(shades from light to dark) to show form(3-d shapes). This should take you a longer than an hour to complete if you are doing it correctly. Do not rush through this. Add details like the pictures on your walls, the items on your shelves, tables, the floor.

If you want to learn more about the painting by Van Gogh that I have attached to this assignment then go to the link below that I have attached.

I hope you are doing well! I miss seeing you everyday. Please let me know if you have any questions.
Mrs. Wong